
How We Did It
The Concept
When brainstorming, I originally started with an idea of doing a tube microphone shootout. Once I prepared my list of microphones to include, I thought I should throw in some condensers as well. I added them to the list and the next thing I knew, ribbons and dynamics were also on the list, which brought the test up to 28 microphones. When deciding on what applications to include, it seemed best to test the mics only in the applications that they are commonly used. Of course this would be much less work, but a few concepts came to mind. I have always been fortunate enough to have the ability to choose the most appropriate mic in my career. Because of this, my knowledge of what a supposedly "non-appropriate" microphone would sound like in certain situations has been stunted. This led to my decision to include all mics in each included application, even kick drum mics on vocals! A test like this could teach me a lot about the sonic characteristics of the different mics and might even reveal some pleasant surprises. Also, what about that one new engineer that just owns a MD421 and is looking to add a new mic to his or her collection? They now have a mic in the test that can be their benchmark while listening to others for a more accurate comparison.
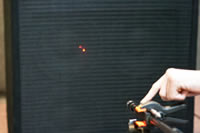
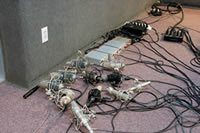
People who know me understand that I am very diligent about making sure that I achieve the most accurate results possible. Since grills on mics vary greatly, measuring the distance between the sound source to the front of the mic grill is not as exact as measuring to the element itself. To combat idiosyncrasies such as this, we decided to use laser lights to align our microphone placement. If we were not able to see the element, we assumed a logical point of reference for that microphone and used it throughout all the tests.
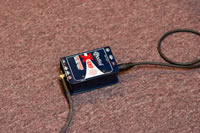
When possible, we eliminated the human element so all microphone captures were consistent. We used a Radial X-amp to reamp our prerecorded electric guitar and bass tracks, which gave us the EXACT same performance every time. Although we were unable to use a technique like this for our other sources, we took several precautions to ensure that each performance was as consistent as possible. When we were able to, we recorded a small group of mics at once in order to capture the same source. These included drum room mics and piano (since it was not close miked). For acoustic guitar, voice, and close miking of speaker cabinets, accurate mic placement is absolutely crucial to our test, so we recorded one mic sample at a time. Once a test was commenced, we did not stop until we had all the samples we needed from that source. This assured that the artist was in the exact same position throughout every sample taken.
The Method
Since this test focused on microphones, we wanted to hear the mics themselves, not the other recording gear. In order to achieve this, we used gear that would not add color into the signal chain. This included Monster P500 cables, an HDV-8 Millennia mic pre, a Lynx Aurora 16 converter, and Nuendo for a DAW. Although it does not affect the sound of the samples you will hear, Focal Twin6 Be monitors were used for playback and our evaluation of the samples. There were no other items in the chain. Except for one microphone, the gain knobs on the Millennia pre amp were the only adjustments made on the way in. The Audix D6 is specifically made for kick drums and high SPL levels. Due to this, we could not get the gain we needed to match the levels of the other mics in certain tests. To compensate, we added gain in Nuendo in order to have a somewhat fair listening test. No other mics needed this adjustment.
Once we decided on a mic placement in front of a sound source, we locked in pair of laser pointers to mark the exact position of the element of the microphone. We would then remove the mic and use the consistent laser beams to position the next mic. No strings or other apparatuses were used that might affect the sound reflecting into the microphone's field of pickup.
We ran a test pass and adjusted the mic pre gain, then captured a take. For the guitar amps, we captured 3 different sounds. Instead of using 3 different combo amps, we decided on using one speaker cabinet and switching the input to it between 3 different amp heads. Using this method, we did not have to align the mic position 3 separate times for the same mic. We did not have stereo pairs of every microphone we were testing, so for piano, we did an overall mono capture 2 feet outside of the opened piano lid. All takes were documented with photography.